
宝塔部署Hostloc论坛自动签到Python脚本(增加server酱推送)
/ 15 min read
Table of Contents
冬冬一直用的腾讯云函数来保持Hostloc论坛的签到,但是最近腾讯云函数开始收费了,最低9块钱一个月,本着能省就省的原则,我们以Python的方式来保持签到。
开始
下载源码(两种方式,自由选择)
- 下载到本地进行修改
浏览器输入https://github.com/DocWho22/hostloc_getPoints/blob/main/hostloc_auto_get_points.py直接进行下载,然后在本地修改好用户米,密码和Server酱SendKey之后再上传服务器。
- 直接下载到服务器
SSH命令行下载:
wget -p /root/hostloc https://raw.githubusercontent.com/DocWho22/hostloc_getPoints/main/hostloc_auto_get_points.py宝塔界面下载:
选择左侧菜单栏,找到文件菜单,点进去之后,选择root目录(随意,自己记住文件的位置就行,演示用root目录),然后点击远程下载,输入文件地址https://github.com/DocWho22/hostloc_getPoints/blob/main/hostloc_auto_get_points.py
进行下载。(为方便记忆,把源文件hostloc_auto_get_points.py重命名为loc.py)

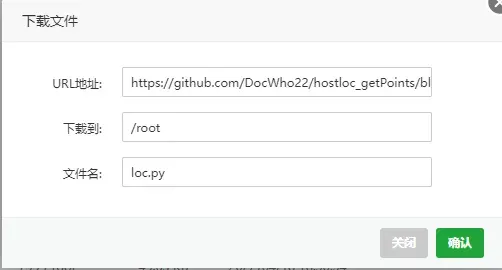
这里附上源代码:
import osimport timeimport randomimport reimport textwrapimport requestsfrom pyaes import AESModeOfOperationCBCfrom requests import Session as req_Session# 随机生成用户空间链接def randomly_gen_uspace_url() -> list:url_list = []# 访问小黑屋用户空间不会获得积分、生成的随机数可能会重复,这里多生成两个链接用作冗余for i in range(12):uid = random.randint(10000, 50000)url = "https://hostloc.com/space-uid-{}.html".format(str(uid))url_list.append(url)return url_list# 使用Python实现防CC验证页面中JS写的的toNumbers函数def toNumbers(secret: str) -> list:text = []for value in textwrap.wrap(secret, 2):text.append(int(value, 16))return text# 不带Cookies访问论坛首页,检查是否开启了防CC机制,将开启状态、AES计算所需的参数全部放在一个字典中返回def check_anti_cc() -> dict:result_dict = {}headers = {"user-agent": "Mozilla/5.0 (Windows NT 10.0; Win64; x64) AppleWebKit/537.36 (KHTML, like Gecko) Chrome/87.0.4280.88 Safari/537.36"}home_page = "https://hostloc.com/forum.php"res = requests.get(home_page, headers=headers)aes_keys = re.findall('toNumbers\("(.*?)"\)', res.text)cookie_name = re.findall('cookie="(.*?)="', res.text)if len(aes_keys) != 0: # 开启了防CC机制print("检测到防 CC 机制开启!")printLog("检测到防 CC 机制开启!")if len(aes_keys) != 3 or len(cookie_name) != 1: # 正则表达式匹配到了参数,但是参数个数不对(不正常的情况)result_dict["ok"] = 0else: # 匹配正常时将参数存到result_dict中result_dict["ok"] = 1result_dict["cookie_name"] = cookie_name[0]result_dict["a"] = aes_keys[0]result_dict["b"] = aes_keys[1]result_dict["c"] = aes_keys[2]else:passreturn result_dict# 在开启了防CC机制时使用获取到的数据进行AES解密计算生成一条Cookie(未开启防CC机制时返回空Cookies)def gen_anti_cc_cookies() -> dict:cookies = {}anti_cc_status = check_anti_cc()if anti_cc_status: # 不为空,代表开启了防CC机制if anti_cc_status["ok"] == 0:print("防 CC 验证过程所需参数不符合要求,页面可能存在错误!")printLog("防 CC 验证过程所需参数不符合要求,页面可能存在错误!")else: # 使用获取到的三个值进行AES Cipher-Block Chaining解密计算以生成特定的Cookie值用于通过防CC验证print("自动模拟计尝试通过防 CC 验证")printLog("自动模拟计尝试通过防 CC 验证")a = bytes(toNumbers(anti_cc_status["a"]))b = bytes(toNumbers(anti_cc_status["b"]))c = bytes(toNumbers(anti_cc_status["c"]))cbc_mode = AESModeOfOperationCBC(a, b)result = cbc_mode.decrypt(c)name = anti_cc_status["cookie_name"]cookies[name] = result.hex()else:passreturn cookies# 登录帐户def login(username: str, password: str) -> req_Session:headers = {"user-agent": "Mozilla/5.0 (Windows NT 10.0; Win64; x64) AppleWebKit/537.36 (KHTML, like Gecko) Chrome/87.0.4280.88 Safari/537.36","origin": "https://hostloc.com","referer": "https://hostloc.com/forum.php",}login_url = "https://hostloc.com/member.php?mod=logging&action=login&loginsubmit=yes&infloat=yes&lssubmit=yes&inajax=1"login_data = {"fastloginfield": "username","username": username,"password": password,"quickforward": "yes","handlekey": "ls",}s = req_Session()s.headers.update(headers)s.cookies.update(gen_anti_cc_cookies())res = s.post(url=login_url, data=login_data)res.raise_for_status()return s# 通过抓取用户设置页面的标题检查是否登录成功def check_login_status(s: req_Session, number_c: int) -> bool:test_url = "https://hostloc.com/home.php?mod=spacecp"res = s.get(test_url)res.raise_for_status()res.encoding = "utf-8"test_title = re.findall("(.*?)<\/title>", res.text)if len(test_title) != 0: # 确保正则匹配到了内容,防止出现数组索引越界的情况if test_title[0] != "个人资料 - 全球主机交流论坛 - Powered by Discuz!":print("第", number_c, "个帐户登录失败!")printLog("第" + str(number_c) + "个帐户登录失败!")return Falseelse:print("第", number_c, "个帐户登录成功!")printLog("第" + str(number_c) + "个帐户登录成功!")return Trueelse:print("无法在用户设置页面找到标题,该页面存在错误或被防 CC 机制拦截!")return False# 抓取并打印输出帐户当前积分def print_current_points(s: req_Session):test_url = "https://hostloc.com/forum.php"res = s.get(test_url)res.raise_for_status()res.encoding = "utf-8"points = re.findall("积分: (\d+)", res.text)if len(points) != 0: # 确保正则匹配到了内容,防止出现数组索引越界的情况print("帐户当前积分:" + points[0])printLog("帐户当前积分:" + points[0])else:print("无法获取帐户积分,可能页面存在错误或者未登录!")printLog("无法获取帐户积分,可能页面存在错误或者未登录!")time.sleep(5)# 依次访问随机生成的用户空间链接获取积分def get_points(s: req_Session, number_c: int):if check_login_status(s, number_c):print_current_points(s) # 打印帐户当前积分url_list = randomly_gen_uspace_url()# 依次访问用户空间链接获取积分,出现错误时不中断程序继续尝试访问下一个链接for i in range(len(url_list)):url = url_list[i]try:res = s.get(url)res.raise_for_status()print("第", i + 1, "个用户空间链接访问成功")printLog("第" + str(i + 1) + "个用户空间链接访问成功")time.sleep(5) # 每访问一个链接后休眠5秒,以避免触发论坛的防CC机制except Exception as e:print("链接访问异常:" + str(e))printLog("链接访问异常:" + str(e))continueprint_current_points(s) # 再次打印帐户当前积分else:print("请检查你的帐户是否正确!")printLog("请检查你的帐户是否正确!")# 打印输出当前ip地址def print_my_ip():api_url = "https://api.ipify.org/"try:res = requests.get(url=api_url)res.raise_for_status()res.encoding = "utf-8"print("当前使用 ip 地址:" + res.text)printLog("当前使用 ip 地址:" + res.text)except Exception as e:print("获取当前 ip 地址失败:" + str(e))printLog("获取当前 ip 地址失败:" + str(e))# serverChan推送信息def sendMessage(serverChan: str, messageTitle: str, messageContent: list):""":type messageContent: list[str]"""api = "https://sctapi.ftqq.com/%s.send" % serverChantitle = messageTitlecontent = "\n".join(messageContent)data = {"text": title,"desp": content}req = requests.post(api, data=data)# 输出log到messageContentdef printLog(log: str):messageContent.append(log)if __name__ == "__main__":username = "在此填入用户名"password = "在此填入密码"serverChan = "在此填入Server酱SendKey"messageTitle = "hostloc签到"messageContent = []# username = os.environ["HOSTLOC_USERNAME"]# password = os.environ["HOSTLOC_PASSWORD"]# 账户和密码# 分割用户名和密码为列表user_list = username.split(",")passwd_list = password.split(",")if not username or not password:printLog("未检测到用户名或密码,请检查环境变量是否设置正确!")print("未检测到用户名或密码,请检查环境变量是否设置正确!")elif len(user_list) != len(passwd_list):printLog("用户名与密码个数不匹配,请检查环境变量设置是否错漏!")print("用户名与密码个数不匹配,请检查环境变量设置是否错漏!")else:print_my_ip()print("共检测到", len(user_list), "个帐户,开始获取积分")print("*" * 30)printLog("共检测到" + str(len(user_list)) + "个帐户,开始获取积分")printLog("*" * 30)# 依次登录帐户获取积分,出现错误时不中断程序继续尝试下一个帐户for i in range(len(user_list)):try:s = login(user_list[i], passwd_list[i])get_points(s, i + 1)print("*" * 30)printLog("*" * 30)except Exception as e:print("程序执行异常:" + str(e))print("*" * 30)printLog("程序执行异常:" + str(e))printLog("*" * 30)continueprint("程序执行完毕,获取积分过程结束")printLog("程序执行完毕,获取积分过程结束")sendMessage(serverChan, messageTitle, messageContent)补充账号信息和Server酱SendKey
打开下载好的源代码,如果你是本地编辑,请用文本编辑工具来打开它,不要用电脑的TXT记事本编辑!
在文件的209-211行,填入自己的Hostloc的用户名和密码和Server酱SendKey。
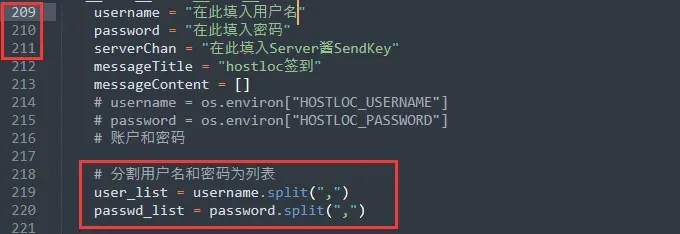
如果你有多个账户,请用英文逗号分割开。
多账户示例:
username = "username1,username2"password = "password1,password2"Server酱SendKey如何你没有,可以去https://sct.ftqq.com/申请,微信扫码注册,在https://sct.ftqq.com/sendkey查看复制自己的SendKey。
编辑完自己的账号信息和SendKey之后,保存,更改名字为loc.py并上传到/root/目录下(演示用,名字改不改都可以,随便哪个文件夹,自己记住就行)。
服务器环境配置
此脚本用到Python3,所以我们要在服务器里安装Python3
apt-get install python3-pip安装完后之后,就可以运行了
python3 loc.py如果运行后提示以下错误,请安装request模块
root@debian:~# python3 loc.pyTraceback (most recent call last):File "/root/loc.py", line 6, in <module>import requestsModuleNotFoundError: No module named 'requests'安装request模块
pip3 install requests安装完request模块之后再次运行python3 loc.py ,如果没有报错,会看到运行日志
root@debian:~# python3 loc.py当前使用 ip 地址:152.67.x.x共检测到 1 个帐户,开始获取积分******************************如果再次报错,请安装pyaes模块
Traceback (most recent call last):File "/root/loc.py", line 8, in <module>from pyaes import AESModeOfOperationCBCModuleNotFoundError: No module named 'pyaes'安装pyaes模块
pip3 install pyaes安装完成之后再次运行python3 loc.py ,直至没有报错,缺什么模块安装什么模块。
创建宝塔自动执行签到任务
在宝塔面板左侧菜单栏,找到计划任务,然后添加shell脚本任务并保存。
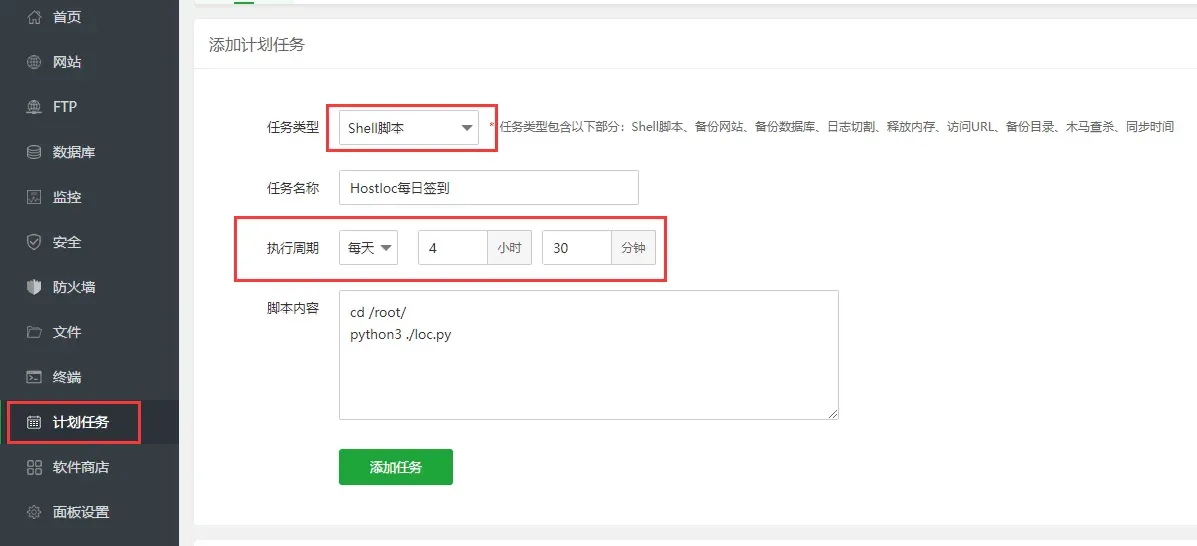
脚本内容:
# 进入loc.py文件所在目录的绝对路径,自己的在哪就写哪里,演示用是root目录cd /root/# 执行签到任务python3 ./loc.py请尽量选择在夜间签到,Hostloc白天防火墙规则严格,密集请求会被当做CC攻击,容易被金盾防火墙屏蔽,导致签到失败。
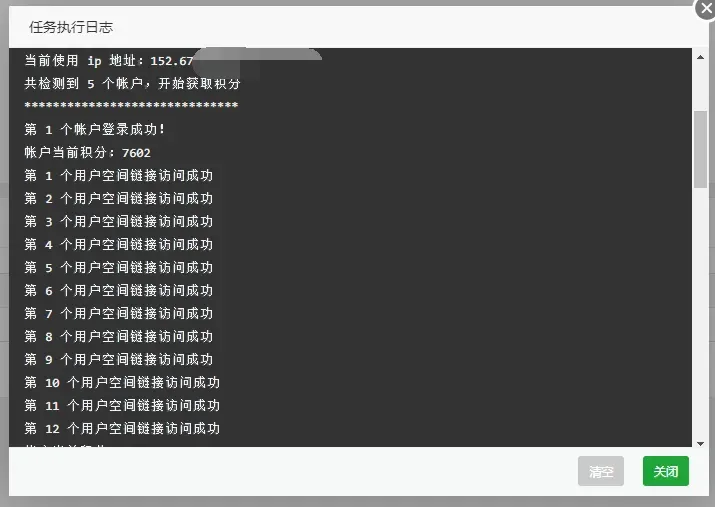
等待签到完成之后,可以自己在后台查看任务执行日志。
日志
微信Server酱提醒:
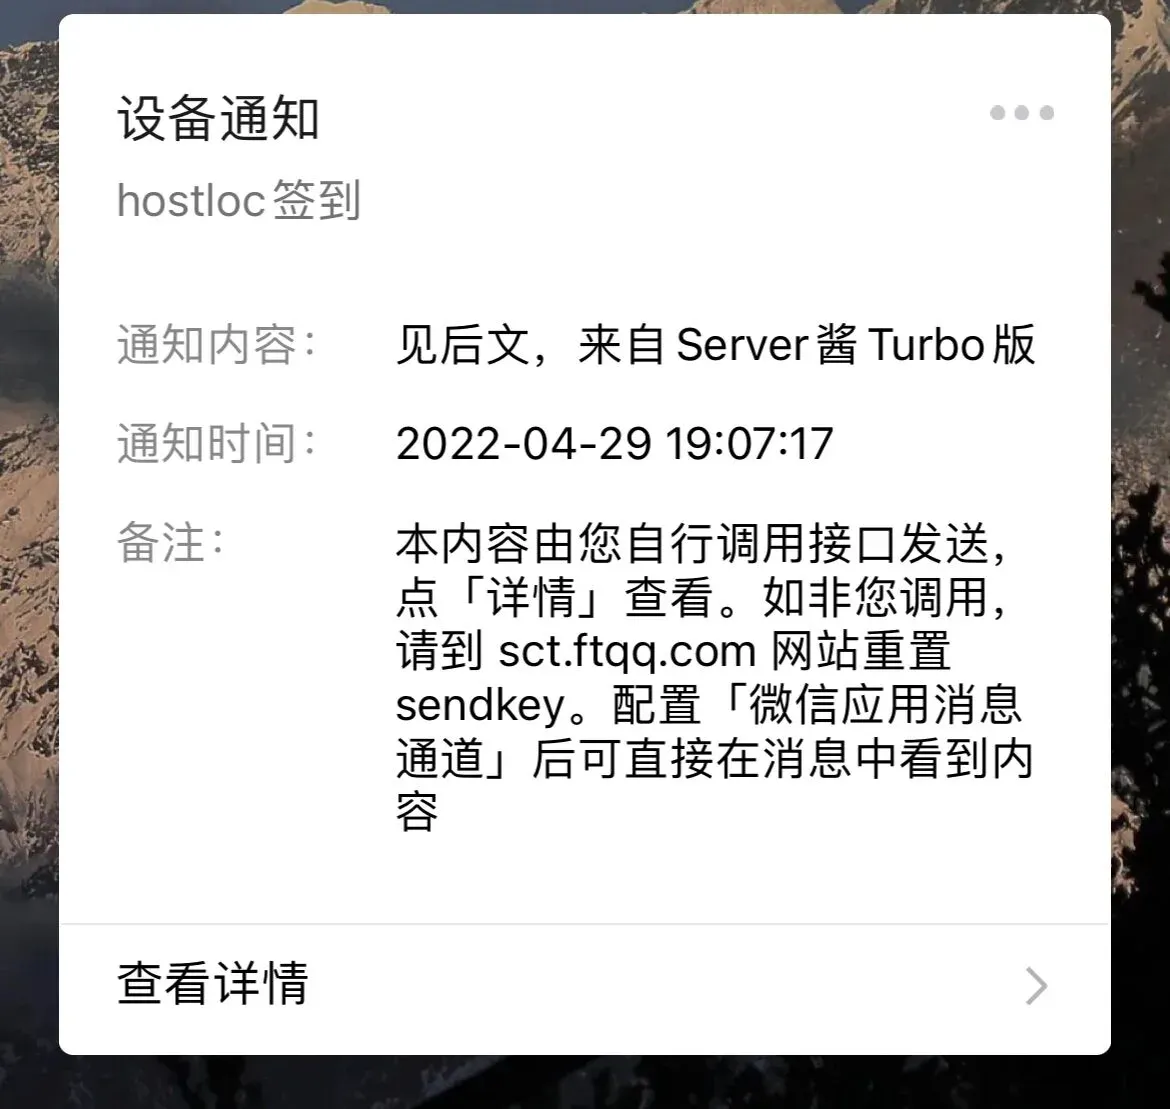

服务器计划任务运行日志:
如果你没有用宝塔面板,请在SSH后台添加crontab任务
新建crontab任务
crontab -e添加(解释:每天2点10分执行python3 /root/loc.py)
10 2 * * * python3 /root/loc.py同样达到每天自动签到的效果,如图:

crontab表达式:
* * * * *- - - - -| | | | || | | | +----- 星期几 (0 - 7) (Sunday=0 or 7)| | | +---------- 月份 (1 - 12)| | +--------------- 几号 (1 - 31)| +-------------------- 小时 (0 - 23)+------------------------- 分钟 (0 - 59)总结
如果这样的方式你觉得麻烦,还可以在浏览器上安装油猴脚本,同样可以实现自动签到,缺点是每天都要打开浏览器。
油猴脚本地址:https://greasyfork.org/zh-CN/scripts/40444-hostloc-checkin
这样每天我们就可以获得Hostloc的20积分,祝大家早日上神仙。
感谢@Jox2018 @DocWho22 等MJJ提供的代码。
随着Github Actions的大规模封杀以及腾讯云云函数开始收费,免费用的资源越来越少,且行且珍惜,希望大家避免滥用。